MQTT over QUIC Bridge
NanoMQ has supported MQTT over QUIC bridging, users can use QUIC as the transport layer of the MQTT protocol to establish a bridge with the EMQX 5.0 message service for data synchronization. This provides a shortcut for end-user devices that cannot integrate or find a suitable MQTT over QUIC SDK, as well as embedded devices that are difficult to modify the firmware, to take advantage of the advantages of the QUIC protocol in IoT scenarios.
The combined cloud-edge message architecture of EMQX and NanoMQ provides a cost-effective solution for IoT scenarios, allowing users to efficiently gather and synchronize data across different regions.
Feature List
QUIC bridging shares following exclusive features and special advantages
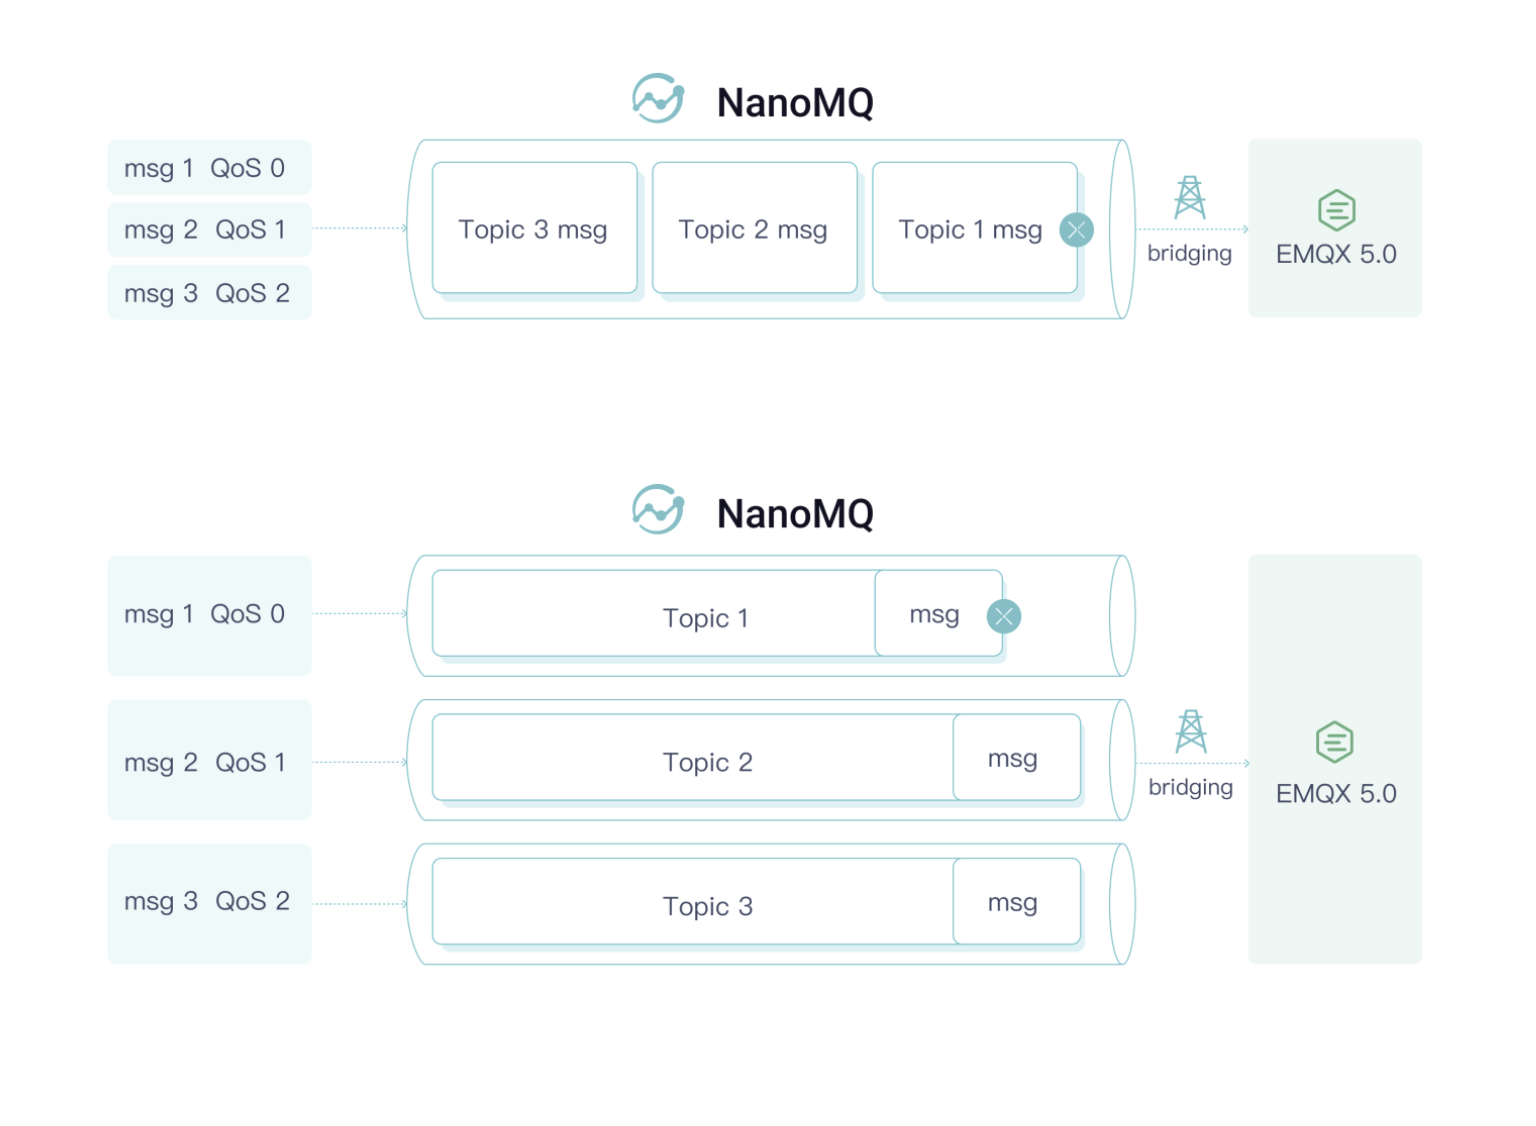
- Multi-stream: Topic-Stream pair, avoid head of line blocking problem
- Hybrid bridging: automatically downgrade to TCP if QUIC is not available
- Message prioritization: Assign High priority for QoS (1|2) messages to ensure bandwidth usage
- O-RTT Quick reconnect: 0 RTT(Round Trip Time)estimate time
Enable MQTT over QUIC
By default, the QUIC module in NanoMQ is deactivated. If you wish to utilize MQTT over QUIC bridging, you need to install NanoMQ via build options and enable the QUIC module during the process.
$ git clone https://github.com/emqx/nanomq.git
$ cd nanomq
$ git submodule update --init --recursive
$ mkdir build && cd build
$ cmake -G Ninja -DNNG_ENABLE_QUIC=ON ..
$ sudo ninja install
TIP
For macOS users, you must compile with make + single thread:
$ git clone https://github.com/emqx/nanomq.git
$ cd nanomq
$ git submodule update --init --recursive
$ mkdir build && cd build
$ cmake -DNNG_ENABLE_QUIC=ON ..
$ make -j1
Configure MQTT over QUIC
Prerequisites
Before setting up MQTT over QUIC bridging, you should install EMQX 5, which provides the MQTT over QUIC messaging services. For instructions on enabling QUIC bridging in EMQX, refer to the EMQX - MQTT over QUIC tutorial.
Bridge Configuration
Once the QUIC module is enabled, you need to configure the MQTT over QUIC bridging feature and related topics in the configuration file. The following configuration file, for example, defines the server address for MQTT over QUIC bridging, connection credentials, connection parameters, message forwarding rules, subscription topics, and queue length.
TIP
Using mqtt-quic as the URL prefix indicates the use of QUIC as the transport layer for MQTT.
Tips: If you enabled SQLite feature, NanoMQ will automatically flush cached messages into disk when network is disconnected. Unlike TCP, NanoMQ will resend cached messages immediately once bridging connection is restored. Without any delaying, message will be send one by one.
Key Configuration Items
- Remote broker address:
bridges.mqtt.name.server - Array of Topics to forward to remote (supports MQTT wildcard): bridges.mqtt.name.forwards`
- Array of Topics to subscribe from remote (supports MQTT wildcard): bridges.mqtt.name.subscription`
QUIC-Specific Configurations
- Switch for hybrid bridging mode:
bridges.mqtt.name.hybrid_bridging - Switch for multi-stream bridging:
bridges.mqtt.name.multi_stream
If you choose to use HOCON configuration format and NanoMQ version >= 0.19, apart from writing the related configurations directly into nanomq.conf, you can also define a separate configuration file for bridging, such as nanomq_bridge.conf. You can then include this file in nanomq.conf using HOCON's include syntax.
Example:
include "path/to/nanomq_bridge.conf"To get detailed log data during operation, you can set the log level log.level in the configuration file.
Start NanoMQ
In the installation directory of NanoMQ, execute the following command to launch NanoMQ:
Test the Bridge
This section uses NanoMQ's built-in client tool to test the newly built MQTT over QUIC bridge. Two connections will be created to connect to NanoMQ and the MQTT over QUIC data bridge respectively, to verify the messaging service.
Test Message Forwarding
Subscribe to the message topic for the remote EMQX Broker:
Subscribe to the forwarding topic "
forward1/#" for EMQX to receive data forwarded by NanoMQ.Open a new command line window, navigate to the
nanomq_clifolder under thebuildfolder, and execute the following command to subscribe:bash## -h {host} ## -p {port number, if unspecified, will use 1883 for MQTT or 14567 for QUIC connection} ## -t {topic} ## --quic {enable quic} ## --q {message QoS, values: 0, 1, 2} ## --m {message payload} ## -u {username} ## -P {password} $ ./nanomq_cli sub --quic -h "remote.broker.address" -p 14567 -t "forward1/#" -q 2Open another command line window and publish a message to the NanoMQ Broker with the topic "
forward1/msg":bash./nanomq_cli pub -h "local.broker.address" -t "forward1/msg" -m "forward_msg" -q 2Go back to the first command line window, you will see the message forwarded by the NanoMQ Broker, for example:
bashquic_msg_recv_cb: forward1/#: forward_msg
Test Message Receiving
Subscribe to the message topic for the local NanoMQ Broker:
Subscribe to the topic
cmd/topic1for NanoMQ to receive data published by EMQX:In the second command line window, navigate to the
nanomq_clifolder under thebuildfolder, and execute the following command to subscribe:bash./nanomq_cli sub -h "local.broker.address" -t "recv/topic1" -q 2In the first command line window, publish a message to the remote EMQX Broker with the topic "
cmd/topic1":bash$ ./nanomq_cli pub --quic -h "remote.broker.address" -p 14567 -t "recv/topic1" -m "cmd_msg" -q 2 -u emqx -P emqx123Go back to the second command line window, you will see the message sent by the remote EMQX Broker, for example:
bashquic_msg_recv_cb: recv/topic1: cmd_msg
If you're interested in evaluating the performance of MQTT over QUIC bridging, you can conduct a benchmark test. Please refer to the guide available at Toolkit - Bench for detailed instructions.
QUIC Multi-Stream Bridging
One of the significant advantages of the QUIC protocol over TCP is that it solves the problem of head-of-line blocking. This advantage relies on the multi-stream feature of a single QUIC connection. To address situations like network congestion or network jitter, NanoMQ and EMQX 5.0 have jointly designed and introduced the Mutli-stream QUIC protocol standard for improved message transmission experience.
Enable Multi-Stream Bridging + QoS Prioritization
To use multi-stream bridging, you simply need to activate the corresponding configuration option:
NanoMQ will then create topics for specific Pub/Sub topics. You can check the effectiveness of this function in the log, for example, when subscribing to the nanomq/1 topic, a data stream will be automatically created:
quic_ack_cb: Quic bridge client subscribe to topic (QoS 1)nanomq/1.
mqtt_sub_stream: topic nanomq/1 qos 1
bridge client is connected!
quic_pipe_open: [strm][0x618000020080] Starting...
quic_pipe_open: [strm][0x618000020080] Done...
quic_strm_cb: quic_strm_cb triggered! 0
decode_pub_message: topic: [$SYS/brokers/connected], qos: 0
mqtt_sub_stream: create new pipe 0x61c000020080 for topic nanomq/1
quic_strm_cb: QUIC_STREAM_EVENT_START_COMPLETE [0x618000020080] ID: 4 Status: 0
Afterward, NanoMQ will automatically route the data packets to different streams based on the topic for transmission. Through internal testing conducted in a simulated weak network environment with 2s latency and 40% packet loss, a significant reduction in latency proportional to the number of streams was observed.
In the meantime, QoS 1/2 packets shares higher priority than QoS 0, which means NanoMQ can assure the more important messages get first seat in limited network bandwidth situation. Therefore users can get best usage of ther network capacity and prevent non-critical messages causing congestion.