快速上手
NanoMQ MQTT Broker (NanoMQ) 是一款用于物联网边缘的超轻量级 MQTT 消息服务器。本指南将以 Docker 部署为例,演示如何快速上手 NanoMQ。
通过 Docker 运行NanoMQ
运行以下命令快速通过 Docker 运行 NanoMQ,分别指定端口 1883、8083 和 8883 用于监听 MQTT、MQTT over WebSockets 和 MQTT over SSL/TLS 流量。
docker run -d --name nanomq -p 1883:1883 -p 8083:8083 -p 8883:8883 emqx/nanomq:latest更多关于 NanoMQ 官方 Docker 镜像的信息,请访问 Docker Hub - nanomq
体验 NanoMQ 消息服务
通过 Docker 启动 NanoMQ 后,本节将演示如何通过 MQTTX 客户端工具 来体验 NanoMQ 的消息服务。首先,下载并安装 MQTTX 桌面客户端。
通过 MQTT X 连接 NanoMQ
打开主程序页面,点击左侧菜单栏的 + 按钮。如果页面为空,您也可以直接点击右侧的 新建连接 按钮来快速设定新的客户端连接。
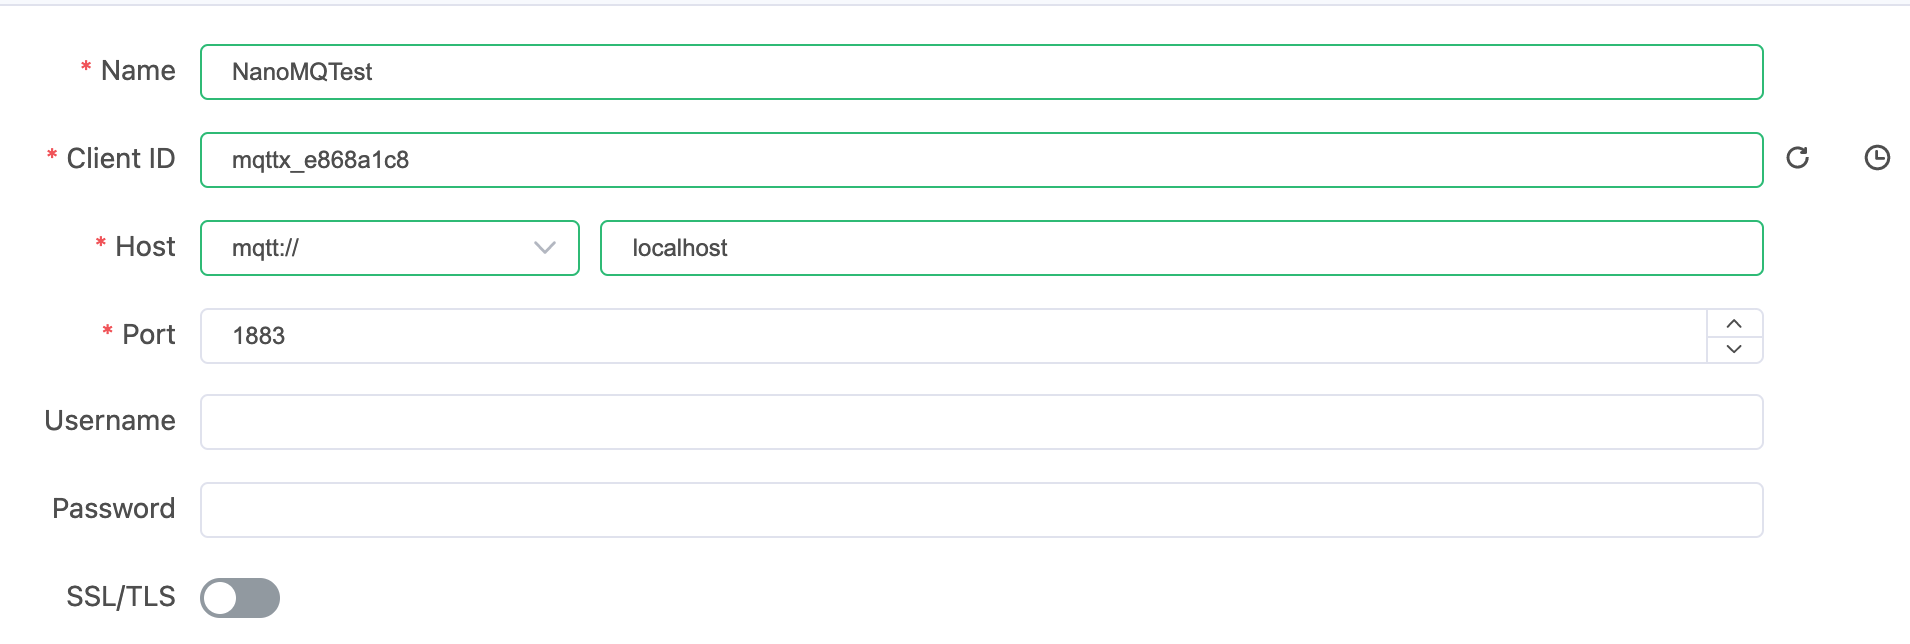
- 在名称字段,输入连接名称。
- MQTTX 会自动填入一个客户端 ID。
- 在服务器地址字段设置协议和服务器地址:这里将选择 MQTT 作为协议,并填入
localhost(或 Docker 实际运行的 IP)。 - 将端口设为 1883 (或根据实际需要设置)。
然后点击右上角的连接,MQTTX 会通过弹窗的形式提示连接已成功建立。
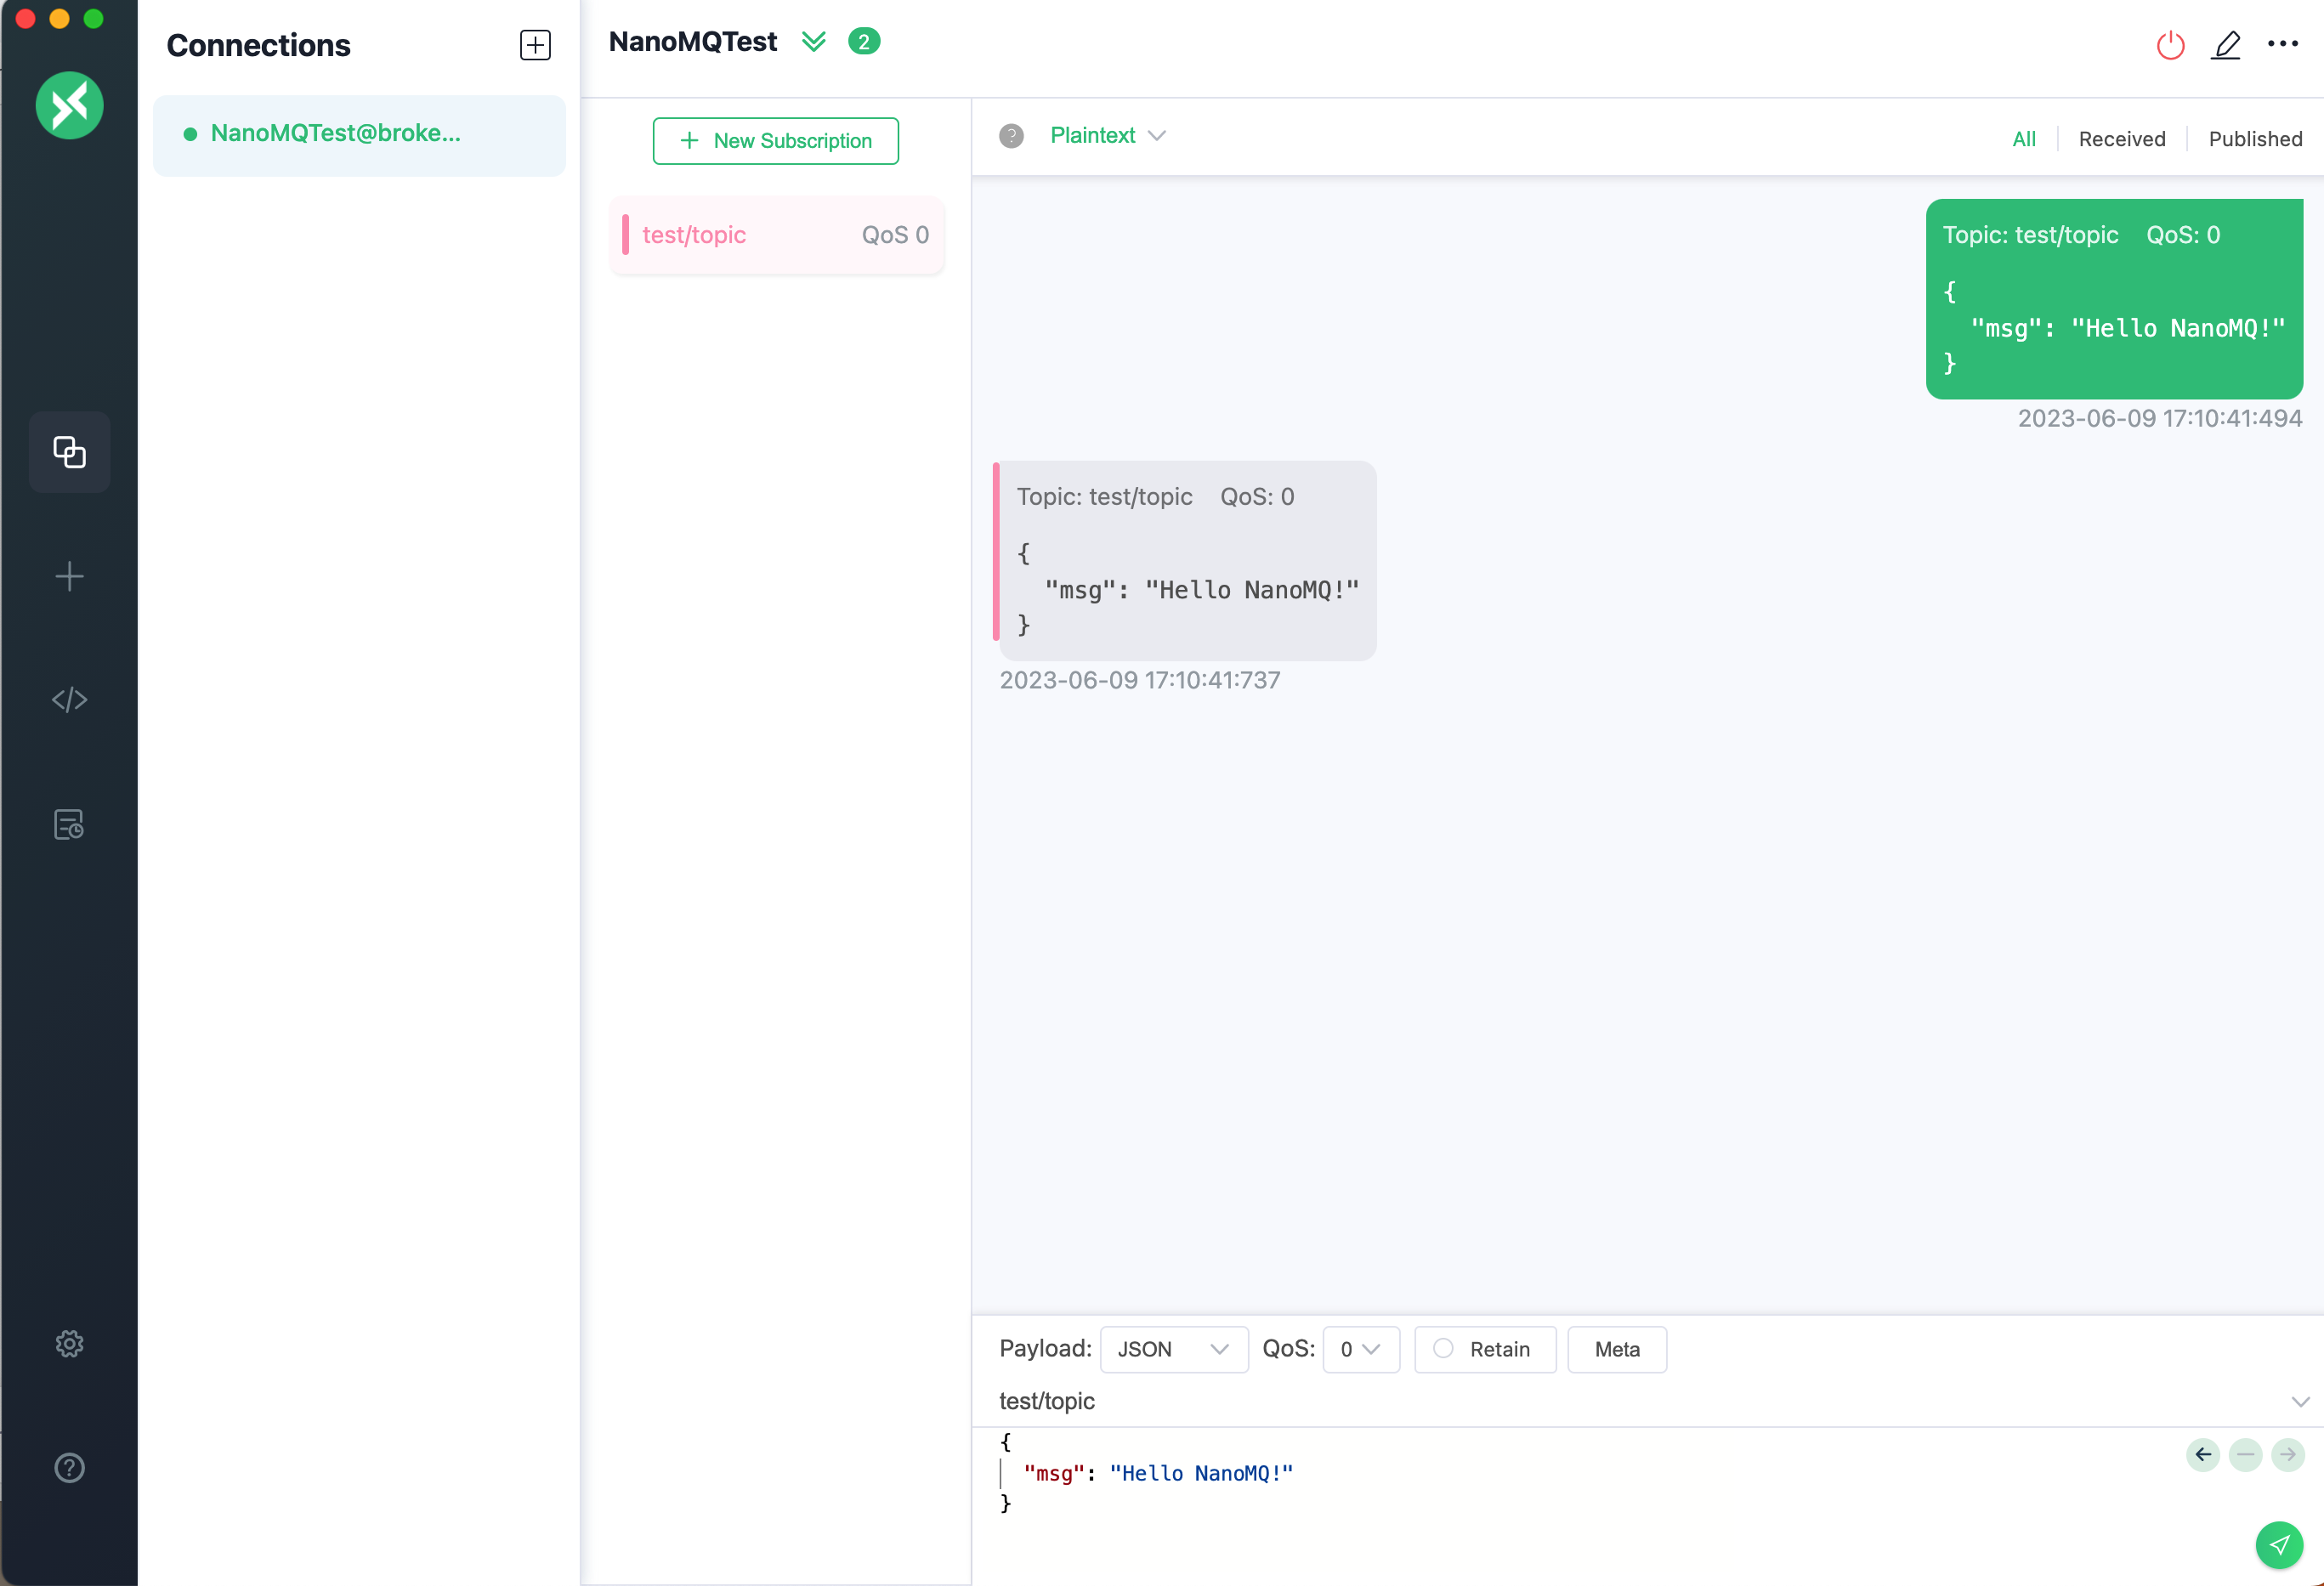
订阅主题
连接成功后,即可进入连接的主界面。点击页面右上角的添加订阅按钮,在弹出的对话框中:
- 输入您想订阅的主题,如
test/topic,其他字段可保留默认设置。 - 单击确认。
发布信息
在连接主界面右下角的消息对话框中,设置消息主题和内容:
- 指定你要发布的主题,例如
test/topic。 - 输入你想发送的消息,例如,"Hello NanoMQ"。
- 点击发送图标。
对话框区域将出现一条消息,表明该消息已成功发布到 NanoMQ 并被转发到订阅主题。
快速上手数据桥接
本教程将继续演示如何搭建一个 MQTT over TCP 数据桥接。
拉取 NanoMQ Docker 镜像
从 Docker Hub 拉取最新的 NanoMQ 镜像:
docker pull emqx/nanomq:latest创建 NanoMQ 配置文件
在本地新建 NanoMQ 配置文件,用于保存 NanoMQ 的订阅和桥接配置。这里将使用 EMQ 提供的免费公共桥接 broker.emqx.io:1883 来构建 MQTT over TCP 数据桥接。
使用文本编辑器创建一个名为 nanomq.conf 的新文件, 贴入以下桥接配置:
bridges.mqtt.emqx1 {
	# # Bridge address: host:port .
	# #
	# # Value: String
	# # Example: mqtt-tcp://127.0.0.1:1883
	# #          tls+mqtt-tcp://127.0.0.1:8883
	# #          mqtt-quic://54.75.171.11:14567
	server = "mqtt-tcp://broker.emqx.io:1883"
	# # Protocol version of the bridge.
	# #
	# # Value: Enum
	# # - 5: mqttv5
	# # - 4: mqttv311
	# # - 3: mqttv31
	proto_ver = 4
	# # The ClientId of a remote bridge.
	# # Default random string.
	# #
	# # Value: String
	# clientid="bridge_client"
	# # Ping: interval of a downward bridge.
	# #
	# # Value: Duration
	# # Default: 10 seconds
	keepalive = 60s
	# # The Clean start flag of a remote bridge.
	# #
	# # Value: boolean
	# # Default: false
	# #
	# # NOTE: Some IoT platforms require clean_start
	# #       must be set to 'true'
	clean_start = false
	# # The username for a remote bridge.
	# #
	# # Value: String
	username = username
	# # The password for a remote bridge.
	# #
	# # Value: String
	password = passwd
	# # Topics that need to be forward to IoTHUB
	# #
	# # Value: String
	# # Example: topic1/#,topic2/#
	forwards = [
		{
			remote_topic = "fwd/topic1"
			local_topic = "topic1"
			qos = 1
		},
		{
			remote_topic = "fwd/topic2"
			local_topic = "topic2"
			qos = 2
		}
	]

	subscription = [
		{
			# # Need to subscribe to remote broker topics
			# #
			# # Value: String
			remote_topic = "cmd/topic1"
			local_topic = "topic3"
			# # Need to subscribe to remote topics QoS.
			# # Please set QoS for each subscription topic
			# # otherwise topic is invalid, NanoMQ won't sub to any topic
			# # Value: Number
			qos = 1
		},
		{
			remote_topic = "cmd/topic2"
			local_topic = "topic4"
			qos = 2
		}
	]
	# # max_parallel_processes
	# # Handle a specified maximum number of outstanding requests
	# #
	# # Value: 1-infinity
	max_parallel_processes = 2
	# # max send queue length
	# # Handle a specified maximum number of message send queue length
	# #
	# # Value: 1-infinity
	max_send_queue_len = 32
	# # max receive queue length
	# # Handle a specified maximum number of message receive queue length
	# #
	# # Value: 1-infinity
	max_recv_queue_len = 128
}
通过配置文件启动 NanoMQ
通过 Docker 启动 NanoMQ,其中通过 -v 将本地配置文件加载到 Docker:
docker run -d -p 1883:1883 \
           -v /path/to/your/nanomq.conf:/etc/nanomq.conf \
           --name nanomq emqx/nanomq:latest
TIP
将 /path/to/your/nanomq.conf 替换为 nanomq.conf 文件的实际路径。
客户端上线/下线事件消息
由于 NanoMQ 内置的 Actor 模型和全异步 I/O, 可以支持事件驱动的消息模式。可以通过订阅系统事件主题来获取上下线的消息。桥接通道的上下线也会在此系统事件主题中发布对应的消息,只需根据桥接客户端ID来分辨即可。
上线消息:
Topic: $SYS/brokers/connected
Message: {"username":"hello", "ts":1691225605933,"proto_name":"MQTT","keepalive":60,"return_code":"0","proto_ver":4,"client_id":"nanomq-8a2a5c2e","clean_start":1, "IPv4":"127.0.0.1"}
下线消息:
Topic: $SYS/brokers/disconnected
Message: {"username":"hello","ts":1691225608391,"reason_code":"8b","client_id":"nanomq-8a2a5c2e","IPv4":"127.0.0.1"}
从0.24.1版本开始,在线/离线事件消息将被重定向到一个合并的话题。
上线消息:
Topic: $SYS/brokers/client_status/${clientid}
Message: {"status":"online", "username":"hello", "ts":1691225605933,"proto_name":"MQTT","keepalive":60,"return_code":"0","proto_ver":4,"client_id":"nanomq-8a2a5c2e","clean_start":1, "IPv4":"127.0.0.1"}
下线消息:
Topic: $SYS/brokers/client_status/${clientid}
Message: {"status":"offline", "username":"hello","ts":1691225608391,"reason_code":"8b","client_id":"nanomq-8a2a5c2e","IPv4":"127.0.0.1"}
并且添加了保留标志到桥接连接/断开事件消息中,以便您可以通过订阅获取更新的桥接连接状态。
测试桥接
本节将继续使用 MQTTX 客户端工具来测试新建的 MQTT 数据桥接,我们将新建 2 个连接,分别连接到 NanoMQ 和 MQTT 数据桥接,用于验证 NanoMQ 和数据桥接的消息收发服务。
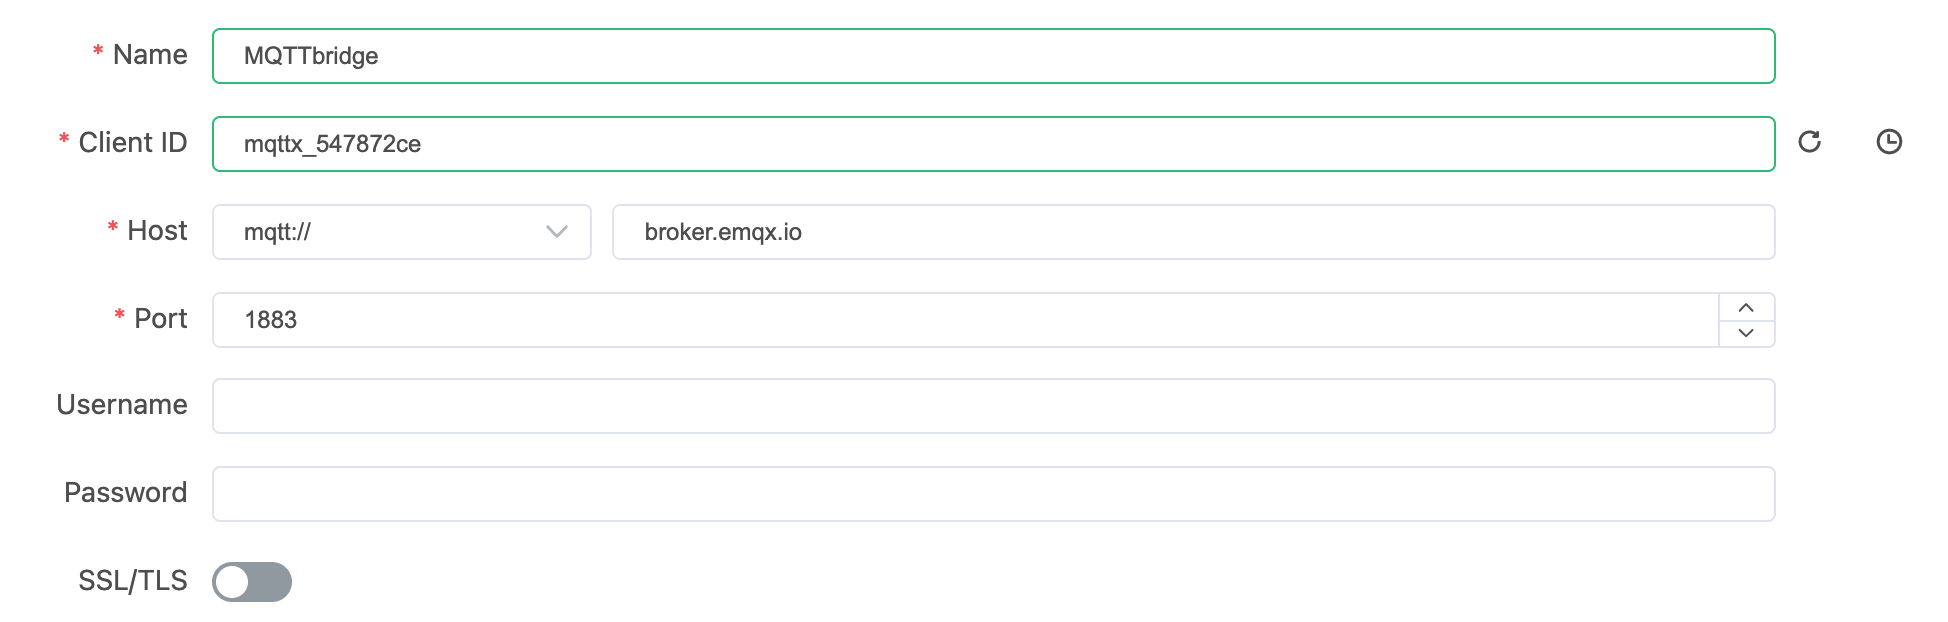
连接到 NanoMQ
连接到数据桥接
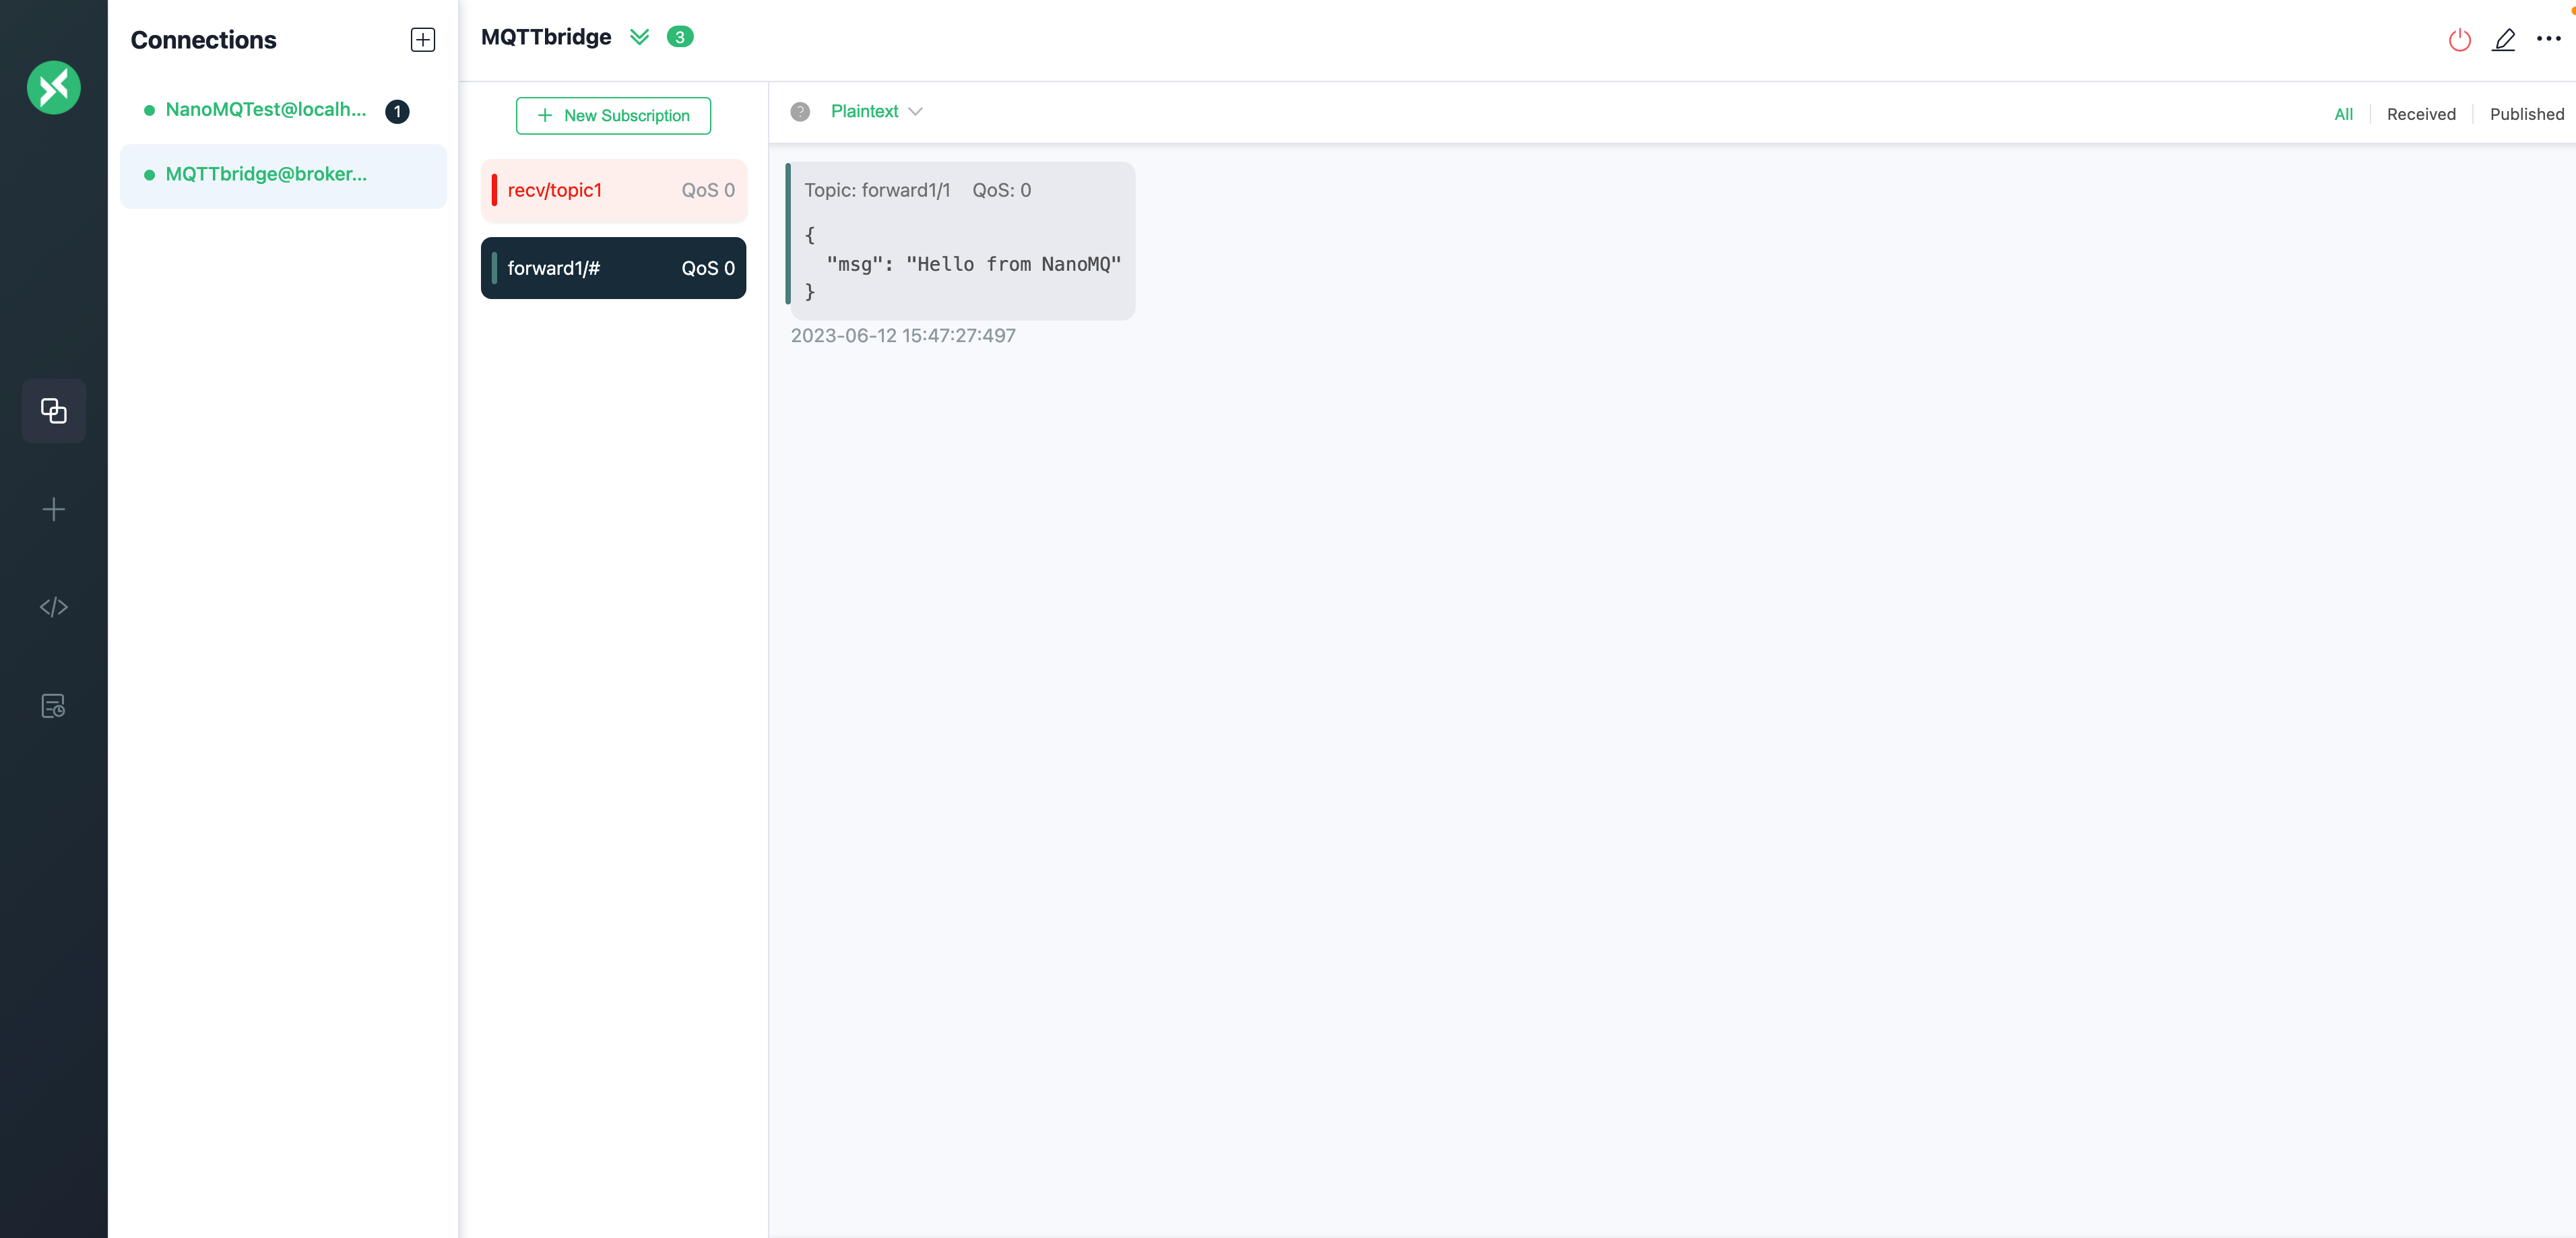
验证 NanoMQ 到数据桥接的消息服务
在连接数据桥接的客户端 MQTTbridge 中,订阅 forward1/# 主题。
在连接 NanoMQ 的客户端 NanoMQTest 中,向 forward1/# 主题发送消息 ,如 Hello from NanoMQ 。
可以看到,消息被成功转发到 MQTT 数据桥接。
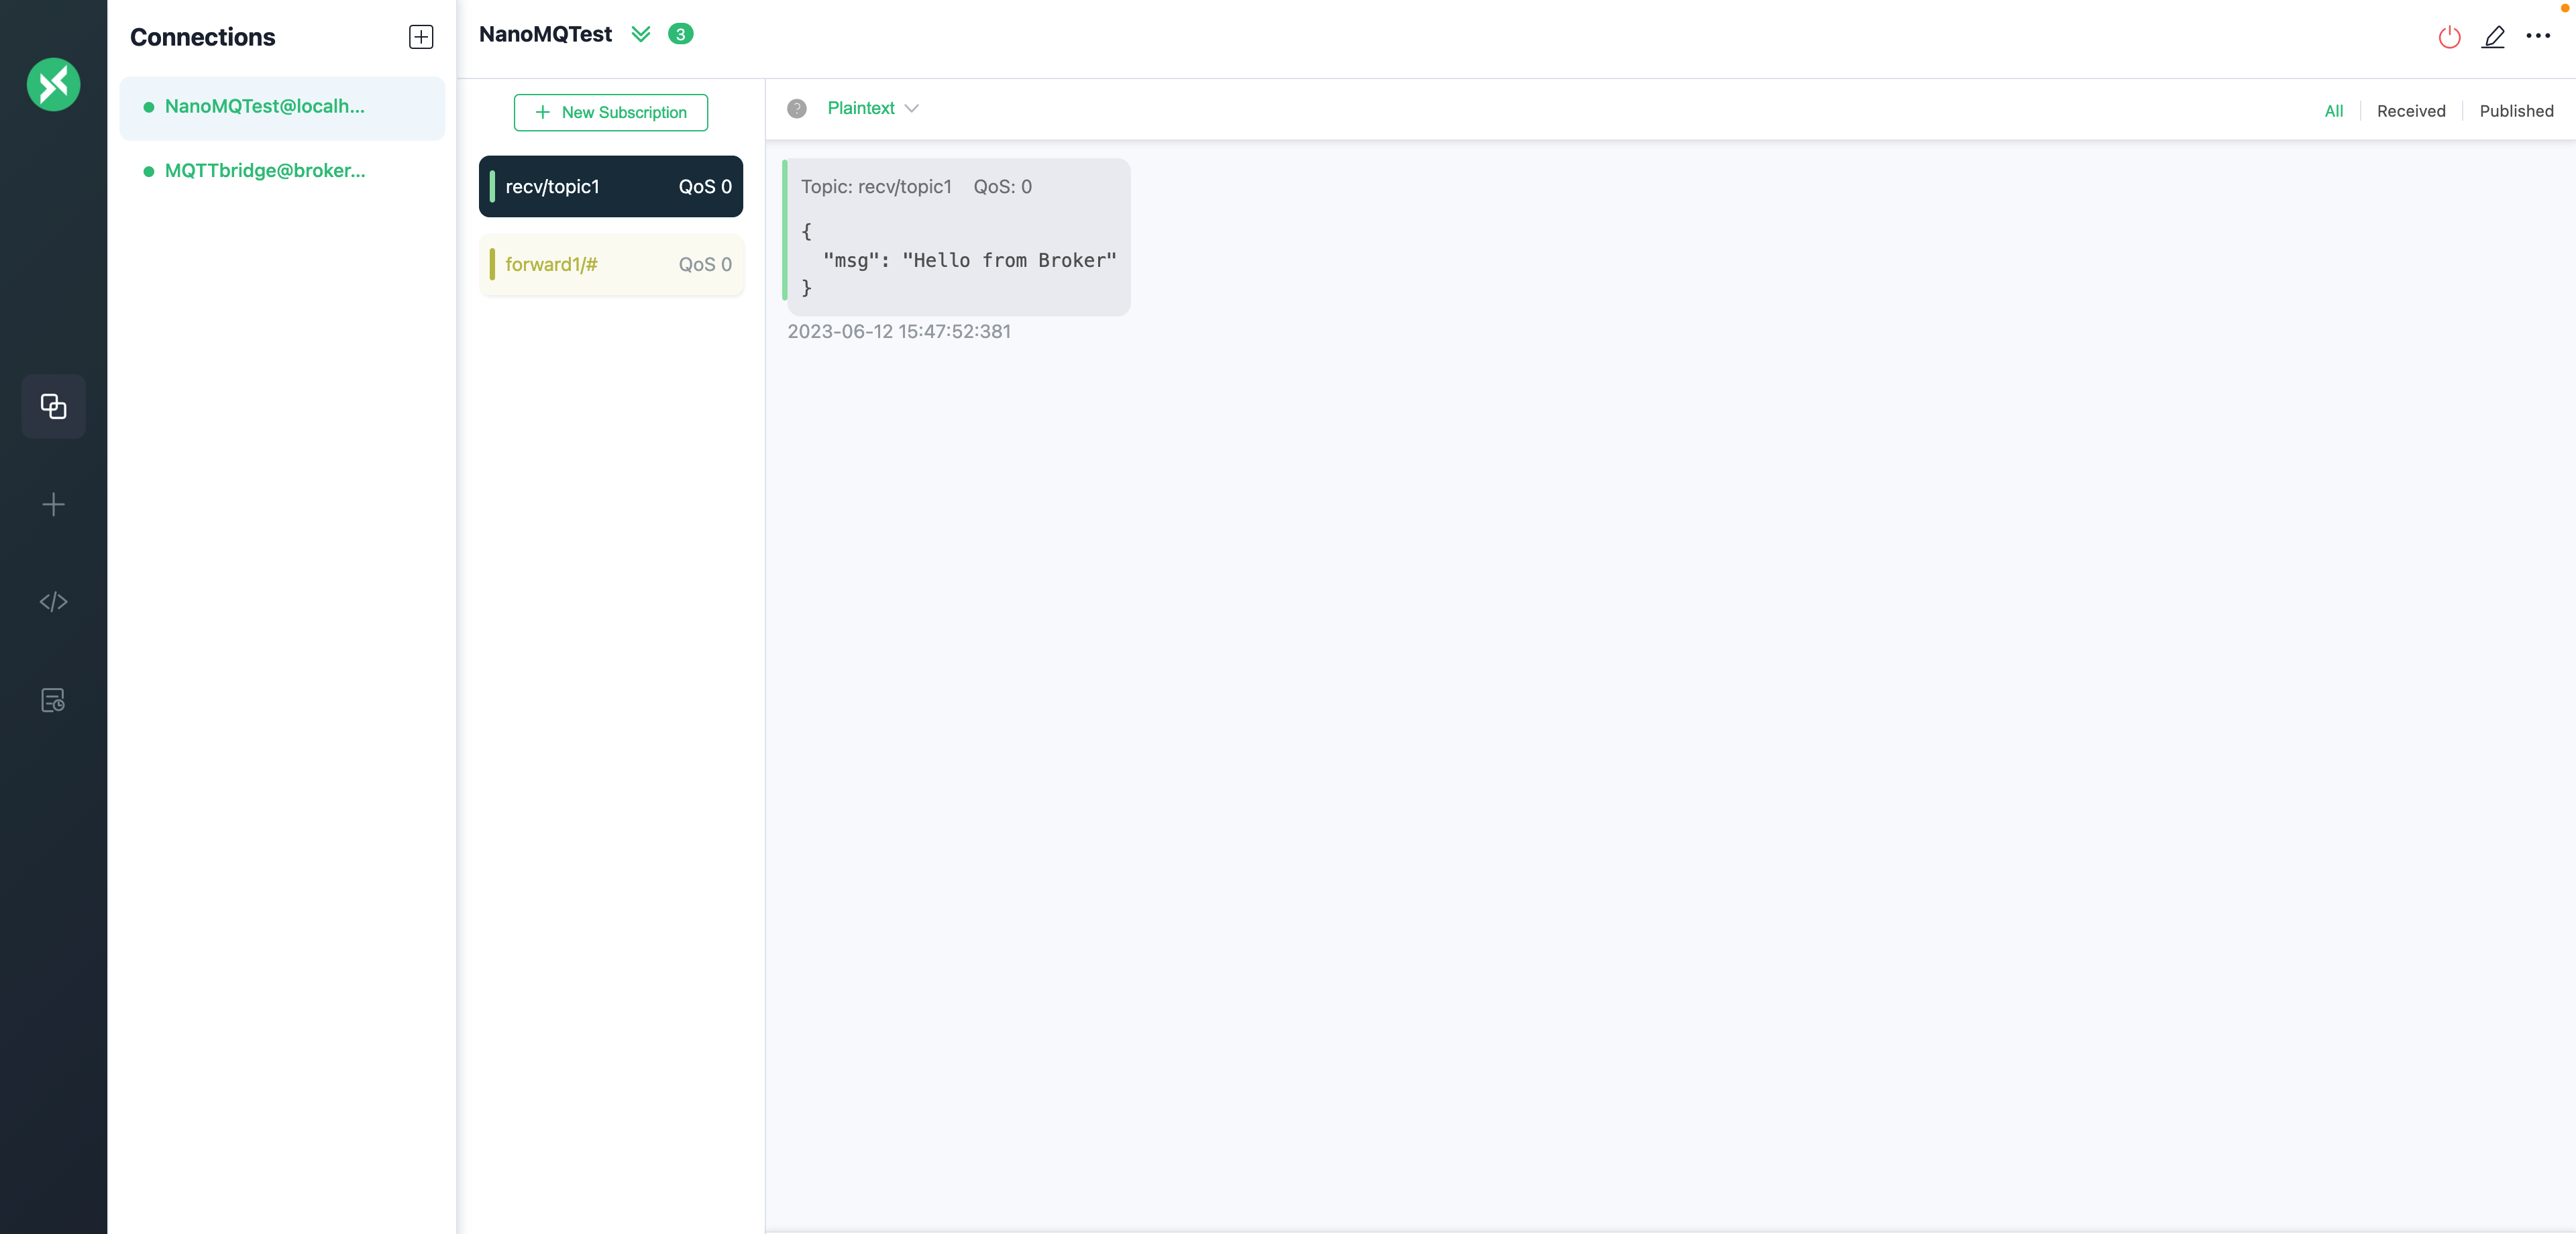
验证数据桥接到 NanoMQ 的消息服务
在连接 NanoMQ 的客户端 NanoMQTest 中,订阅 recv/topic1 主题。
在连接数据桥接的客户端 MQTTbridge 中,向 recv/topic1 主题发布信息,例如: Hello from broker.emqx.io 。
验证是否收到了 broker.emqx.io 发布的消息。